
MailChimp is like your virtual postman — sending your mails everywhere in the world!
For this exercise, I will create an email opt-in form using MailChimp. MailChimp is one of the coolest email services marketing provider in the world. According to wikipedia, it has 7 million users that sends 10 billion emails (!) a month. Picture it as your virtual postman who sends letters to everyone on your email list.
By creating an email opt-in form using MailChimp, you can automatically create the sign up form, the “Thank You” page, the confirmation email, the Unsubscribe message and many more. Most importantly, it MailChimp manages your list of subscribers based on the campaigns they enlisted.
To enjoy more of MailChimp’s tutorials and tips, you can go to MailChimp’s Youtube channel.
I will use the free version — or the Forever Free Pricing — that allows me to send 12,000 emails a month to my list of up to 2,000 subscribers. If you are a business owner who wants to promote products and services online, you can check MailChimp’s pricing plan.
Just a refresh, we want to create an email system that will gather email, store them and conveniently send custom emails to subscribers. These are the features that you can expect when you register with MailChimp.
To start, you need to register/sign-up.

1. This is what your dashboard looks like. Before you create a sign-up form, you need to create a list first. A list saves subscriber’s email address.

MailChimp’s dashboard is clean, isn’t it?
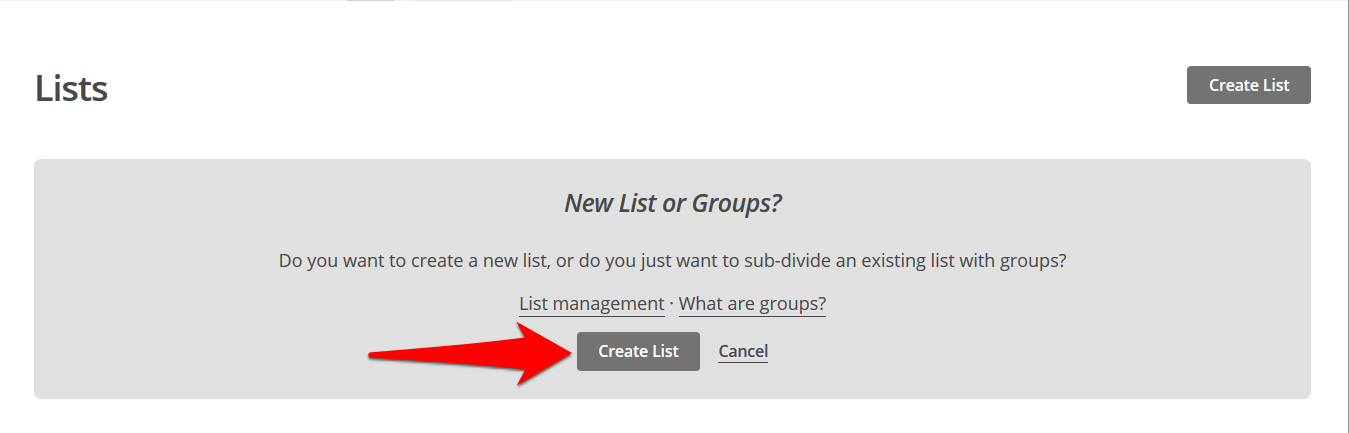
2. Click Create List.

3) This window will appear. Since this is your first ever list, you have to click “Create list”.
4) Fill up the form along with your email message to subscribers.

5) Scroll down and tick the necessary boxes. I decided to tick all of them so I can see all the notifications. Click “SAVE” when you are done.
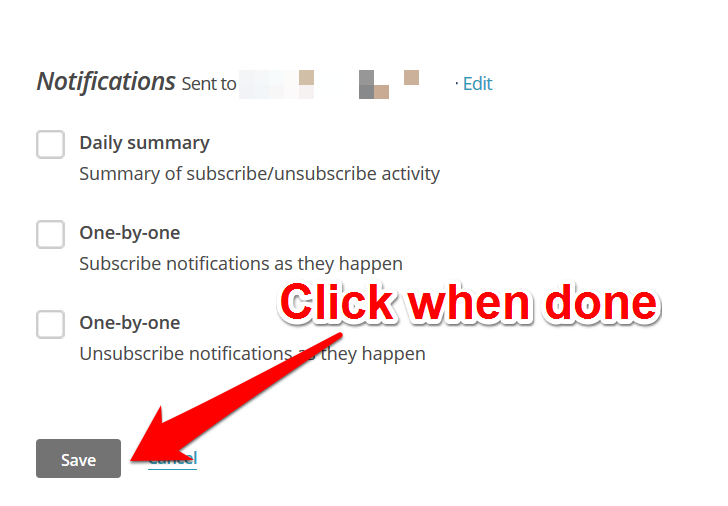
I suggest to tick all boxes for comprehensive reporting.
6) You now have a list! This list will store all the email address of those who clicked to your ad. But for now, click “Sign up forms”.

You now have your first MailChimp Email list. Congratulations!
7) There are different types of sign-up forms. But what we are after is the first one: the General Form. Click “Select” to continue.

Using a sign up form depends on your goal.
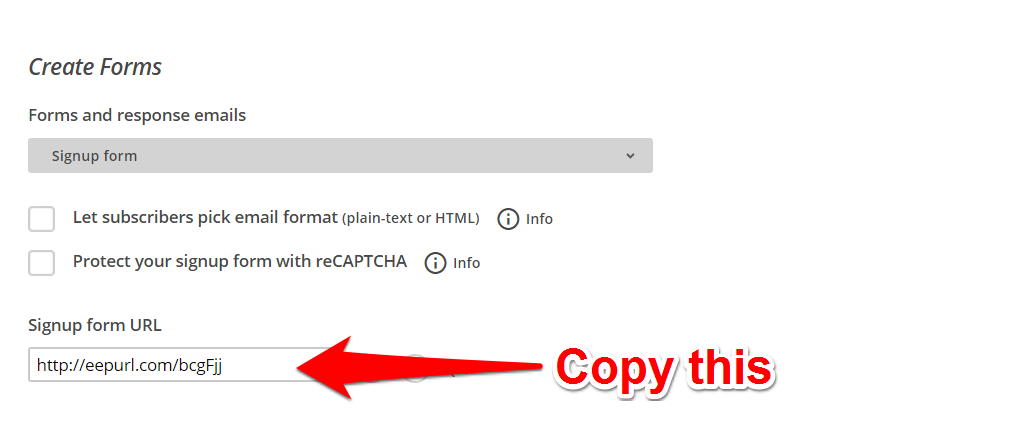
8) This is the sign up form dashboard. The URL inside the “Signup form URL” is the one that will be placed inside the Landing Page Monkey.

9) Click and edit your message. Put the message found on your poster then SAVE.

The message must reflect the promise and benefit.
10) If necessary, click “Add a Field” to put additional boxes on your landing page. But for me, I’d rather let my prospects give me their email address only.

11) Click Design It to add some blings to your opt-in page.

12) Each tab inside the box represents an element on the opt-in page. You can change the color as well.

You have to mix and match to get the desired effect.
13) All throughout this article, I am only discussing the Sign up form. However, it is only a part of an entire email system for a campaign. Meaning, MailChimp have built several other forms associated with the campaign being made — which is in this example, the Facebook Ad Course.
To explain even further, notice that if you drop down the “Sign up form” tab, there are still different forms associated with it like: Sign-up forms with alerts, Sign-up Thank you page, Opt-in confirmation email and so on.

The other types of forms you need for your email campaign
14) So, if you choose Sign up “thank you” page, this will show the Thank You page that subscribers will see once they entered their email address, just like this:

A Thank you page example
15) Of course, you can customize it by copying and pasting the “Thank You” page made from Tumblr as explained in the past article. All you have to do is to copy and paste the URL in this box:

Copy and paste the Tumblr URL here to create your own Thank You page
16) The good news? You do not have to design each forms. Each forms will copy the design made to the Sign up form.
17) Lastly, copy the opt-in form’s URL (located on the Sign up form tab) to Landing Page Monkey. Like this:
Copy this Mailchimp URL to Landing Page monkey
Go to your Landing Page Monkey account.

On Landing Page Monkey, go to Step 3 – Autoresponder Integration. Drop down and choose MailChimp
On the Landing Page “Edit Page” dashboard, choose “Step 3 – Autoresponder Integration”. Specify MailChimp as the AR Type.
Having an effective and convenient email opt-in form will help you easily collect your prospect’s email address. It is important to remember that your email opt-in form is an extension of your Facebook post. It must include the promise, incentive, headline and call to action.
